Showing posts with label tutorial. Show all posts

Monday, 21 October 2013

Make It! DIY Cat Toys


As much as I love my little cat guys, I do resent how much one might pay for a cheaply produced cat toy, if you went out to buy such a thing. Our kittens love to play, like the children do, with boxes, the wet washing, jingly things etc, but to prevent them destroying the house (that is, both children and cats) sometimes toys are a good answer. 

To welcome my new cats home, my children and I put together some simple cat toys we have had endless fun with.

We made two types of toy, a Cat Wand and some Mice.

CAT WAND INSTRUCTIONS
You need a range of ribbon, or scrap fabric strips,
craft feathers (or collected from garden?),
string (here we used out string from the veg box),
a bamboo cane
and some sort of ball. This is an old golf practice ball, which worked very well.


MOUSE
You need some more scrap fabric
a piece of string or ribbon for tail
some stuffing - toy stuffing/wool work best but you could also add some catnip
sewing kit

I have made a sort of pattern to download free here. Apologies for scrappy hand drawn-ness of it, I don't have the correct software or know-how to make a better one....


Sunday, 13 October 2013

Apple and Rosewater Cupcakes - Random Recipe


As previously explained I had a lot of sugared rose petals looking for a raison d'etre this week, so we created this recipe, like a summer frankenstein, out of carrot cakes and neccessity. Also I bought Rosewater in a weak moment last year and it's quite hard to find recipes to use it up in. Try these if you dare......


Ingredients:

100g Brown Sugar
160ml Sunflower Oil
2 eggs
1 tblsp Rosewater
200g Self-Raising Flour
150g Grated (cooking) Apple

Preheat oven to 180 (GM4)

Beat the eggs, then add to the sugar in a large bowl.
Mix in the oil, and rosewater.
Sift in the flour, then finally fold in the grated apple.

Spoon into 12 bun cases and bake for 20 mins until well risen.

Remove to wire rack to cool

We put a little pink coloured water icing on top of ours, with the sugared rose petals.


Friday, 11 October 2013

Make It! Old-fashioned Sugared Rosepetals


After discovering the joys of looking through recipe books, my daughter asked recently if it was possible to eat flowers - after all, here they were decorating salads and cakes in  this book. Although slightly contradictory to my careful messages about 'what is food/what is not food' we went with the suggestion, and tried making sugared rose petals. 

I remembered making these with my mother quite a bit (not sure why!? She is not a fancy cake maker) and they are, as it turns out, quite easy to make. Although, they use uncooked egg white so if egg is a problem in your house, be warned!

You need:

Edible Petals, such as Rose. Choose some nice shapely ones from the middle of the rose.
Egg white
Caster sugar
Two plates/shallow bowls
Lined tray or clean plastic board

Method:

You can wash the petals lightly then shake dry if you need to.
Put the egg white and caster sugar onto two plates/wide shallow bowls .
Holding the petal lightly dip both sides into the egg white, then into the sugar.

Leave on your tray/board to dry for at least an hour. We used to put ours in the airing cupboard but mine dried out fine in the kitchen this time. I guess the key is to dry them somewhere not too humid.

Lovely lovely on top of little cupcakes, not so great just eaten on their own!!

We made some Apple and Rosewater Cakes to put these on, an entirely made up cake recipe derived from my need to use up apples and the existence of the sugared rose petals. They turned out very tasty, and what they hey, I'll post up that recipe if you like.


Friday, 26 July 2013

Make It! Fun Peg Dolls

We love making peg dolls! The ones in this tutorial were made by myself, and my sweet girls. They did a great job, I hope you will agree.

What you will need:

Old fashioned wood pegs. I got ours from a craft shop.
Acrylic Paint
Paint Brush
Cocktail Stick or very small brush
PVA Glue
Scraps of fabric and ribbon, buttons etc

Also useful, a shoe box/lid you can slot the pegs onto to dry them upright.


TIPS FOR CLOTHES

To fit the skirt better, sew a running stitch around the central hole before you put it on the doll.
You can cut out little collars etc to add to the dolls, and embellish. Just use lots of clear drying PVA and it's not very hard. Although your kids will get very sticky.....


I have entered this in the Pinaddicts Challenge this month, because I have been pinning Peg Dollies like crazy lately. Come look at my Dolly Daydreams board on Pinterest full of dollspiration!

Tuesday, 23 July 2013

End of Term Again


Teacher gifts. Teacher gifts? Always a chore as although we LOVE our kids teachers, and we KNOW they don't want 32 boxes of chocs, it's still soooo hard not to just crack on with gifting them a box of Milk Trar!

This year I made some large pencil case type efforts, zipped and lined. Not setting the world on fire but hey, teachers need a lot of stationery, right? Also, I do love that Marmalade range, so pretty.


Not much help now, but for next time (winks - let's get organised, eh?) I did a tutorial a little while back about making little christmas decorations using your kids pictures, which could easily be turned into lavender bags if you stuff them with, well, lavender.


Locally, I had a whole bunch of teacher gifting things selling. They never made it to my online shop because I sold them all to people at a craft fair and then via personal orders (gotta love Facebook). I think I am wearing out the lavender bag path now for my daughters teacher, but other kids can give them, fine. I also sold some apple cards, and a few personalised versions of the lavender bags. Quite pleased with those, I will keep that design for my shop next year though, it was very popular!


Tuesday, 16 April 2013

Make It! Twitter Cushion Tutorial

Hi, yesterday I posted a picture of a cushion that I made, and thought that you might like to know how I did it. It is quite an easy one, and not hard to get a really smart result.

You will need:

A piece of base fabric, such as calico, which should the same width as your cushion pad and length should be the height of your cushion x2 plus 20cm. 
Four pieces of bias binding or wide ribbon each the width of your fabric
A simple motif (Very easy to find in Google or indeed in an embroidery book - or you could just trace around a shape you liked)
A piece of lightweight interfacing. Fusible is easier, but I give the method for non-fusible because that is what I had.
Scraps of fabric, similar weights.


What to do:


First prepare your cushion cover. Press each short end towards the RIGHT side, pin on your ribbon or bias tape and top stitch this at top and bottom.


Now lay the fabric over your cushion pad to determine where the centre is. This is where the front of your cushion will be. I also added bias tape at the top and bottom of my cushion front, which I added by simply pinning straight and topstitching on.

 Prepare your motif: Using a fabric pencil or similar, place the interfacing over your motif outline and trace. Then cut it out.

Prepare your patchwork: I have suggested doing this after the motif because it helps to know exactly what shape and size you need when planning your patchwork piece. I cut my scraps into roughly square or rectangular pieces, sewed them together on the machine, pressing regularly, until I had something the right size. Not very scientific!


Assembling the motif: Now lay the interfacing shape onto the wrong side of your patchwork. If you have fusible interfacing you can press now. If not, use pins. Cut around the shape leaving whatever seam allowance you feel comfortable with.  Clip all the curves. This is very important!

Get out your needle and thread and baste around the shape, turning in your edges neatly as you stitch them under. Satisfying. Don't be too finikity about the stitches. Feel free to use whatever super funky clashing colour you have. It's easier to take out that way!


Assembling the cushion: Pin the motif where you like on the cushion front. I chose dead centre but that's just me. I then machine stitched the motif on, and then (using a stitch ripper) removed the basting thread. I chose a pretty ordinary stitch for this one, but I did briefly consider a proper blanket stitch. The stitch you chose will change the character of the cushion, and I do like a nice hand done applique. But I was trying to be speedy!

Now, last but not least, fold the cushion right sides facing, with the centre front flat and the two pieces top and bottom overlapping. This makes the envelope your cushion cover will be. Fasten and stitch along the side edges. When you turn it out you should have a nice cushion cover. Stuff your pad inside. Does it look like this?


Monday, 25 February 2013

Make It! Hand-pieced Teacosy

Due to an unexpected exodus from my house of all distracting children, I may now have time to post up a quick "tutorial" of my now finished teacosy! Actually this is a 'method'  tutorial as you will need to switch over to a previous tutorial halfway through but I'm sure you'll manage brilliantly. This is the kind of patchwork that lends itself to a free form experience, I think! More on that later. 

The eventual teacosy will look something like this: 

Although you will need to use what ever scrap fabric you have around to achieve this look! Yours may well look more classy, if you use a more careful selection process!

You will need:

An A4 piece of paper with the top edges rounded off (this is your 'pattern' it fits most medium sized teapots but if yours is quite tall you may need to modify the 'pattern')
A hexagonal template (patchwork template or cut out of card). Mine is 3 inches at the widest point. A smaller hexagon would make a pleasing effect too.
At least 40 pieces of paper cut into hexagons using a template.
At least 40 pieces of scrap fabric slightly larger than your hexagonal template.

2 pieces A4 size fabric for the lining
2 pieces A4 size iron-on interfacing
2 pieces of A4 size wadding

Method:

1) First you need to make a load of hexagon pieces. Baste your fabric pieces onto the paper, turning the excess to the back.


 These ones are not very neat! I like to iron them and you could also trim them a little. Make lots - at least 40 if you're using a 3" hexagon. More if smaller.

2) Using a neat non-visible stitch like matress stitch sew together HALF the hexagon pieces. I like to use a stitch you can't see but my mum does it with a simple over stitch and it does look nice because she can do perfect tiny elf stitches. Construct one line of five then add another line above until you have a piece of work that is about four lines high. If you lay your pattern piece over it you will see where you need to add any to have the correct size. Make two of these patchwork sections.
3)Now you have to undo it all! At this point I would recommend pressing the fabric and maybe even using a little spray starch to keep it pristine. Using a pair of sharp scissors or stitch ripper, cut and pull out carefully all your basting threads. Then extract the paper pieces. I use a pin to pop them out. 
4)Cut out the pieces of interfacing to match your cosy pattern, then iron the  interfacing onto the wrong side of the patchwork making sure that there are no gaps. Trim the patchwork piece so that it is also the same size as the pattern.

To complete the cosy you need 6 pieces the same shape: 2 patchwork fused to the interfacing/2 wadding/2 fabric lining.


Construction of this beast is very simple, you simply need to sew the patchwork and lining at the bottom edge, make a wadding sandwich and then sew all around the outer edge. You're now thinking:  Arg, what?! Read this tutorial for making an egg cosy which uses exactly the same method. Read from Step 3 and bobs your uncle. I did write a tutorial for making a tea cosy which was in Creative Crafting Mag: it's remarkably similar (One Trick Pony, moi?).

Happy Making x


Thursday, 15 December 2011

Cute and Quick Personalised Decorations


If you are constantly enchanted with your children's drawings, have a scanner (or maybe use a photo, or a drawing they did on a computer programme), some freezer paper and a printer that isn't too temperamental, then you can whip up some glorious decorations. I'm sure my daughter's teacher will treasure this one we made for her for ever (she is apparently dressed as a queen although I never got to the bottom of why..). I did a picture tutorial today. Enjoy!

NB: Printing onto freezer paper - if you have never done this before there is an excellent step-by-step on the Crafterhours blog which I recommend you look at. Once you have tried it you will love it! I hope. I accept no responsibility for printers not loving it (sorry! but that's how it is!!)


Scan, Iron, Print


Cut


Sew - see note below!


Stuff and GiFT!

Wednesday, 7 December 2011

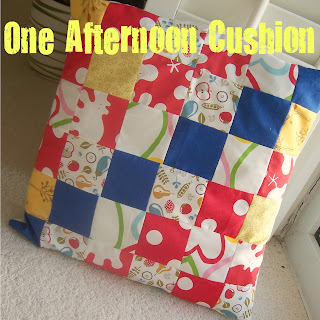
One Afternoon Cushion Tutorial (of sorts)


As most days I just waddle around ineffectually wondering how I could already be 36 weeks pregnant (arg!) I was very pleased today to have decided upon a project and finished it in one afternoon. SO I thought that I would share this wonder with you and also provide you with details. A perfect last minute christmas gifticle as it is so quick to whip up. I hardly need point out that a simple square patchwork cushion might be easy and quick to make but there are far more accomplished patchworkers out there on the blogosphere so please don't mention the fact that my squares aren't all aligned etc etc. I know! And I would be the first to admit it's a little rough and ready. But! ONE afternoon! I did it during the toddlers nap!!

To make your own you will need:

one cushion pad
36 squares of fabric. For my cushion pad which was approx 15" I used  2 7/8" sq. I used 6 different patterns.
Cotton fabric for the back the same width as the cushion but longer. Hence mine was 15" x 20".
Some bias tape the width of the cushion (ie 15")

1. Arrange the fabric squares first to decide on your layout/pattern. I arranged mine in lines of lighter and darker fabrics but what you do will depend on the fabric choices.
2. Sew together in rows using a 1/4" seam, press these and then sew the rows together. Press again.
3. Cut the backing fabric into half. Sew bias tape along  the edge of one piece.
4. Taking the other piece of backing fabric, press over one edge 1/2", then fold and press over again to create a neat edge. Topstitch this.
5. Now assemble the cushion. Right sides together, pin the patchwork front to the two back pieces making sure that the bias trimmed edge is underneath the simple hemmed edge, and that they have a nice large overlap. This will create the envelope opening. Stitch all around the edge.
6. Turn right side out. Admire. Put on the pad and display!

The back showing the bias trim opening
A note on fabric choice: this one was made using scraps from previous nursery projects and is going into a childs room! Hence the primary colours. You are in no way obligated to make one this garish.
  

Monday, 18 April 2011

Last minute Easter - Chocolate Lollies


If you are looking for a delicious - and easy - no bake Easter thingamabob to do with your children this Easter, can I please share with you my recent foray into chocolate lollies. I am sure that there are many other tutorials out there done by stylistically advanced persons who can manage - evenness - beauty - symmettry. But hey, I did these in 15 minutes with a 5 year old and a 1 year old. I dare say that older children could make these completely alone (provided they are old enough to work with melting choc!! Disclaimer: I am not responsible for what disastrous mess ensues from that). Caution: for health and safety reasons I feel I must add - be really careful if you are using boiling water! and with that hot melted choccy. Mmmmm.

You need: 
Tasty chocolate - milk, plain or white according to preference.
Lolly sticks - I used 6 per 150g of chocolate. 
Selection of sprinkles
Clingfilm or a silicon baking sheet
Flat baking tray


First melt the chocolate. I use this ancient technique of putting a bowl on top of a pan of water then heating the water until the choccie melts. I am told that you can melt chocolate in a microwave - but I don't hold with that kind of witchcraft.  


Prepare the baking tray by layering clingfilm or a non-stick baking sheet onto it. Spoon out the chocolate, using the back of the spoon to make thick patches of choc (I tried to achieve egg shapes). While the chocolate is still wet, lay the lolly stick on it (at least 1/3 of stick should be covered) and move it slightly to ensure it's embedded in the choc. 


Hurrying up in case the chocolate dries (! I did this with small children remember) decorate each lolly. Then place the completed tray of lollies in the fridge. They're done as soon as they're cold and hard. Lovely. Look how cute they look, and authentically child engineered. They'd be nice for parties too. I had no problem with the cleaning up either. 


Enjoy xx


Thursday, 7 April 2011

Make it! Egg Cosy Tutorial


I am feeling all full of the joys of spring today, and I have been meaning to post up this tutorial for an easy egg cosy project for, like, ages, so it seemed that today was the day! Its not really as thorough as it could be but I am assuming you do not need me to dot all the i's. Post a comment if anything needs clarifying. I check the blog depressingly often. xx

You need: 
squared paper
four rectangles of fabric the correct size (see below) - two for the outer and two for the lining
a piece of wadding or insulating material such as Insul-Brite
a pretty trim/braid
pins, thread, sewing machine etc

Step One: cut out an egg cosy template - I just used squared paper. I am not going to give you the template here because as you can see it is simply a rectangle with the top end rounded off. Just measure the egg cups you have at home and make a rectangle which is slightly wider than half the circumference.

Use the template to cut: two main pieces, two lining pieces, two interlining pieces (from the wadding)


Step Two: take your braid or trim and attatch it to the fabric you are using for your cosy outer. I left 1 cm to give me some space above the seam allowance.  

Step Three: Sew one outer piece and one lining piece together at the straight edge by placing right sides together and stitching in place. Press flat as shown.


Step Four: Excusing the mess in the photograph below (!) place the two egg cosy pieces right sides together and sandwich them between the wadding pieces as shown. Now stitch all around the whole egg cosy leaving a small (approx) 4cm gap somewhere in the lining side.


Step Five: Turn it all right side out and slip stitch (or, as I later thought,  mattress stitch might be neater) the hole shut. Then push the lining inside the cosy.
You should now have this:


OK? Pretty easy - quite cute.