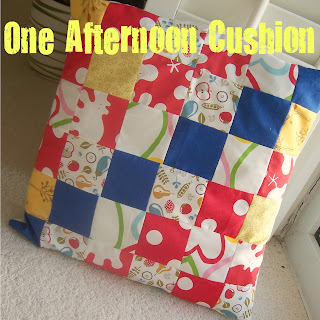
As most days I just waddle around ineffectually wondering how I could already be 36 weeks pregnant (arg!) I was very pleased today to have decided upon a project and finished it in one afternoon. SO I thought that I would share this wonder with you and also provide you with details. A perfect last minute christmas gifticle as it is so quick to whip up. I hardly need point out that a simple square patchwork cushion might be easy and quick to make but there are far more accomplished patchworkers out there on the blogosphere so please don't mention the fact that my squares aren't all aligned etc etc. I know! And I would be the first to admit it's a little rough and ready. But! ONE afternoon! I did it during the toddlers nap!!
To make your own you will need:
one cushion pad
36 squares of fabric. For my cushion pad which was approx 15" I used 2 7/8" sq. I used 6 different patterns.
Cotton fabric for the back the same width as the cushion but longer. Hence mine was 15" x 20".
Some bias tape the width of the cushion (ie 15")
1. Arrange the fabric squares first to decide on your layout/pattern. I arranged mine in lines of lighter and darker fabrics but what you do will depend on the fabric choices.
2. Sew together in rows using a 1/4" seam, press these and then sew the rows together. Press again.
3. Cut the backing fabric into half. Sew bias tape along the edge of one piece.
4. Taking the other piece of backing fabric, press over one edge 1/2", then fold and press over again to create a neat edge. Topstitch this.
5. Now assemble the cushion. Right sides together, pin the patchwork front to the two back pieces making sure that the bias trimmed edge is underneath the simple hemmed edge, and that they have a nice large overlap. This will create the envelope opening. Stitch all around the edge.
6. Turn right side out. Admire. Put on the pad and display!
 |
| The back showing the bias trim opening |


No comments:
Post a Comment