Showing posts with label cushions. Show all posts

Friday, 14 February 2014

Things I Love

Happy Valentines Day

Thought that today is a good day for sharing what I love at the moment. Of course I love my children! And my lovely husband (*so long suffering)


If you want to know more about what I love, I counsel you to look to my Pinterest boards. Yes, I have a weakness for sewing things, and cushiony goodness

via Pinterest


And interior decor daydreaming

via Pinterest


And dolls - all sorts. I love the ways these dolls are posed. This image came to me on Pinterest natch but you can also find more dolly fun of the sort on the actual website Cook You Some Noodles.

via Pinterest


And Medieval things both Ancient and Modern. I admit, it's because I LOOOOVE Game of Thrones, but I did also study Medieval Art at Uni, m'kay.

via Pinterest


I love pinning! What do you love?


Tuesday, 16 April 2013

Make It! Twitter Cushion Tutorial

Hi, yesterday I posted a picture of a cushion that I made, and thought that you might like to know how I did it. It is quite an easy one, and not hard to get a really smart result.

You will need:

A piece of base fabric, such as calico, which should the same width as your cushion pad and length should be the height of your cushion x2 plus 20cm. 
Four pieces of bias binding or wide ribbon each the width of your fabric
A simple motif (Very easy to find in Google or indeed in an embroidery book - or you could just trace around a shape you liked)
A piece of lightweight interfacing. Fusible is easier, but I give the method for non-fusible because that is what I had.
Scraps of fabric, similar weights.


What to do:


First prepare your cushion cover. Press each short end towards the RIGHT side, pin on your ribbon or bias tape and top stitch this at top and bottom.


Now lay the fabric over your cushion pad to determine where the centre is. This is where the front of your cushion will be. I also added bias tape at the top and bottom of my cushion front, which I added by simply pinning straight and topstitching on.

 Prepare your motif: Using a fabric pencil or similar, place the interfacing over your motif outline and trace. Then cut it out.

Prepare your patchwork: I have suggested doing this after the motif because it helps to know exactly what shape and size you need when planning your patchwork piece. I cut my scraps into roughly square or rectangular pieces, sewed them together on the machine, pressing regularly, until I had something the right size. Not very scientific!


Assembling the motif: Now lay the interfacing shape onto the wrong side of your patchwork. If you have fusible interfacing you can press now. If not, use pins. Cut around the shape leaving whatever seam allowance you feel comfortable with.  Clip all the curves. This is very important!

Get out your needle and thread and baste around the shape, turning in your edges neatly as you stitch them under. Satisfying. Don't be too finikity about the stitches. Feel free to use whatever super funky clashing colour you have. It's easier to take out that way!


Assembling the cushion: Pin the motif where you like on the cushion front. I chose dead centre but that's just me. I then machine stitched the motif on, and then (using a stitch ripper) removed the basting thread. I chose a pretty ordinary stitch for this one, but I did briefly consider a proper blanket stitch. The stitch you chose will change the character of the cushion, and I do like a nice hand done applique. But I was trying to be speedy!

Now, last but not least, fold the cushion right sides facing, with the centre front flat and the two pieces top and bottom overlapping. This makes the envelope your cushion cover will be. Fasten and stitch along the side edges. When you turn it out you should have a nice cushion cover. Stuff your pad inside. Does it look like this?


Monday, 15 April 2013

Pinterest Challenge - Twitter Cushion

Cushion making is something that I love doing but in general I don't. This is mainly because there are several ladies in my local area who have stalls making almost exclusively cushion related items and as I am in competition with them at craft fairs, I find making different stuff increases the interest in my stall. Machievellian? Or just ignoring a market? I do find that there's a limit to the amount of cushions and stuffed lavender hearts people will buy, and I have always had this terrible urge to swim against the tide...... However, this might be a wrong-headed approach as my bunting and owls (quote circa 2009: I will NEVER make bunting or owls) have been the most financially successful products I produce so there's a lesson in market forces for you!

Recently I was asked very nicely if I would do a children's craft party for a friend. Normally an instant nope, but I know the girl is super into sewing, and at 11 more than capable of using a sewing machine and keen to improve her skills. Apparently her friends also have some sewing smarts, so I was OK with providing some materials and know-how. It might be fun, and I do have a primary school teaching background so am not afraid of a small group of happy girls! They want to do cushions, I'll give them some applique tips, provide materials and templates, and encourage them to design their own. 

To get my creative juices flowing, I made a Pinterest board and thought it might be a good idea to make myself a cushion to get restarted on the old cushion making. 


So I am entering this little beauty into the Pinaddicts Challenge this month because it is a pinterest inspired piece. If you tune in tomorrow I hopefully will be posting a bit more on how I made it because it was a nice EASY project and good for scrap usage too, which we always like here at scrooge central. I have called it my Twitter cushion because after I made it I realised how good it would be as the prize in a giveaway I was planning to run on Twitter. So I'm afraid this cushion already has a new home. It's gone to Amy's Button Box who was the lucky winner of my 700 followers prize draw. Sorry!

Wednesday, 7 December 2011

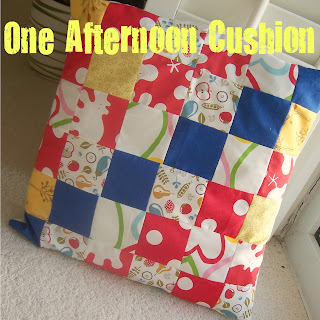
One Afternoon Cushion Tutorial (of sorts)


As most days I just waddle around ineffectually wondering how I could already be 36 weeks pregnant (arg!) I was very pleased today to have decided upon a project and finished it in one afternoon. SO I thought that I would share this wonder with you and also provide you with details. A perfect last minute christmas gifticle as it is so quick to whip up. I hardly need point out that a simple square patchwork cushion might be easy and quick to make but there are far more accomplished patchworkers out there on the blogosphere so please don't mention the fact that my squares aren't all aligned etc etc. I know! And I would be the first to admit it's a little rough and ready. But! ONE afternoon! I did it during the toddlers nap!!

To make your own you will need:

one cushion pad
36 squares of fabric. For my cushion pad which was approx 15" I used  2 7/8" sq. I used 6 different patterns.
Cotton fabric for the back the same width as the cushion but longer. Hence mine was 15" x 20".
Some bias tape the width of the cushion (ie 15")

1. Arrange the fabric squares first to decide on your layout/pattern. I arranged mine in lines of lighter and darker fabrics but what you do will depend on the fabric choices.
2. Sew together in rows using a 1/4" seam, press these and then sew the rows together. Press again.
3. Cut the backing fabric into half. Sew bias tape along  the edge of one piece.
4. Taking the other piece of backing fabric, press over one edge 1/2", then fold and press over again to create a neat edge. Topstitch this.
5. Now assemble the cushion. Right sides together, pin the patchwork front to the two back pieces making sure that the bias trimmed edge is underneath the simple hemmed edge, and that they have a nice large overlap. This will create the envelope opening. Stitch all around the edge.
6. Turn right side out. Admire. Put on the pad and display!

The back showing the bias trim opening
A note on fabric choice: this one was made using scraps from previous nursery projects and is going into a childs room! Hence the primary colours. You are in no way obligated to make one this garish.
  

Saturday, 25 June 2011

Wobbly Teefs

This whole week has been consumed (at times quite literally - see below) by The Saga of The Wobbly Teeth. DD1 was very excited when she found that both her lower front teeth were wobbling. A few children in her class have lost teeth, and some of her friends are currently sporting gaps so losing teeth could not come quickly enough for her! Anyhow, after some time telling everyone about the teeth, refusing apples ('mummy, pleeeeese cut it up its hurting my wobbly teef') and worriting them in the mirror it seemed that we were ready to LOSE THE FIRST TOOTH. All very excited (as she is my eldest her first tooth is significant for me, too) but then suddenly after her meal two days ago - it was gone........ She had managed to eat it along with the beans on toast. Yum!

After some terrible dejected moping we convinced DD to write a letter to the Tooth Fairy explaining what had happened, and Lo and Behold, She was gracious enough to give 50p in lieu.


Now today  the second wobbly tooth has come out properly (I think DD might have pulled it out herself - ew) I have provided this little tooth pillow so that she can keep her tooth in style - until tonight. The only question is: does the Tooth Fairy pay more for an actual tooth? Or is it a flat rate? Arg! Parenting Manuals never touch on these thorny questions.

Tuesday, 2 November 2010

November!

Where does the time go? I have been completely wrapped up in the Folksy October Listings Club, which seems to have eaten a whole month and now I turn round to find the world deep into Autumn. Clocks have gone back, making every evening seem so long, but the children seem to be sleeping better which has to do with it being properly dark at bedtime. Hooray!

I have so many things planned for this month! Specifically:
1) Spray paint some old picture frames I've hoarded white to create a display of family photos
2) Make up cushions for the lounge, I bought some Brompton Road fabric which is so cool.
3) Spray paint loads of fir cones for Christmas (I can leave this but I figured I'd have a massive spray painting sesh!!)
4) Craft Fairs? I am supposed to be booked into some, but childcare is proving an issue.
5) Make a Christmas Pudding/Cake (When is Stir-Up Sunday, exactly?)
6) Knit daughters new jumpers  - again I have the materials, but the flesh is weak.
7) Make a dinosaur toy out of Pirate fabric (it's a commission, I'm getting paid for this I guess it is theoretically No 1 but I only just remembered it)

Ahhh must stop I am scaring me.

Here for soothing purposes is a photo of the fabric I mentioned above.
See the subtle background detail? It's a bit less subtle in real life! 

Friday, 15 October 2010

October Folk Fest - Day 15

Have fallen off the wagon a bit with listings and all that due to? laziness? baby crawling into everything? hospital appointments? life! But there have been some really fun items listed again today so here we go, a peek into the October Folk Fest!
Booties by Danni
Once Upon a Time in the North
Blue Daisy Glass
Pants and Paper
Audrey's Cat
Strawberry Anarchy


Friday, 8 October 2010

Folksy Friday - Man's Best Friend

I have been in two minds this week whether to do my usual FF with a theme or stick to promoting the October Fest Folks. But I love my selection on the theme of dogs this week so I couldn't resist showing you the cute things I have found, and then at the weekend I can go back to the Folksy promotion. I also have a great new Folksy shop to showcase on Sunday, but you will have to wait til then. And then it'll be on my Facebook page not here! 


Tartan Scotty Christmas Tree Decoration by Made by Dolly (Me!!)
Black Scotty dog cushion from Sara Tierney  
Puppy Bone Toy from Bambi's Boutique 
Wooden Scottie Puzzle from Dach Craft
Wonky Dog Albert from Cherry Tree Handmades
Terrier Pill Box from Kettle of Fish


Friday, 20 August 2010

Folksy Friday - Spaced Out

It's Friday and I due to having seen 4am (ouch) I have been rather spaced out. I smell a theme coming on!


Robot and Rocket Pegs by Spaldilocks


Rocket the Dinosaur by Made by Dolly


Space Invader Earrings by Tessies


Astronaut Cushion by Sixes and Sevens 


Rocket Man Cape by Iwishiwasa

Sunday, 16 May 2010

Cushions


On the other hand, for the bird room, I have also got some amusing 60s style tree print fabric which I got from IKEA that would make a good cushion. And then I could also team it with homemade copies of my current favourite high street cushions from John Lewis! OK that's the cushions sorted - I reckon white walls................